Ignition Mods Page 1 - Go to Page one two three
REOPUS: A brand new product for the OPUS ignition problem - click on the logo to visit site.

Ignition modifications and repair
Getting the best from the V12 engine with carbs
In years gone by, the accepted "quick fix" for the frequently "baked" vacuum retard module on the distributor was to simply disconnect it and plug the vacuum source (on the underside flange of the left rear carb). The average mechanic could get away with this as the customer would not notice the difference in performance because the problem had probably existed for some time and it does no long-term damage. Over time, it became the generally accepted procedure.
Now, I don't know of any other engine that runs solely on the distributor's centrifugal advance curve, which is what the "fix" leaves you with. I tried the fix and found the engine was OK but very lacklustre. I wasn't happy with such a compromise. An engine needs varying degrees of ignition advance/retard at different revs and loads. The centrifugal advance alone would not give this. So I decided to re-instate the vacuum retard module. But first I had to fix it!
I tried to buy a replacement vacuum module and found them difficult to obtain except one place who wanted about £80!
So, after fixing the old one myself (described below) I reinstated my vacuum retard and rediscovered the performance difference - Jaguar used the ignition retard system to satisfy required emissions on the carb engine yet still give the required performance characteristics.
As the age of my car means it does not have to be tested for emissions in the UK, I eventually went a stage further and converted my carbs and ignition to a vacuum advance as per pre-HE fuel injected V12's. I found it a further improvement over the vacuum retard. More about this on the next page, but first I'll describe how I fixed the vacuum retard module (a vacuum advance module can be repaired in the same way).
Repairing the vacuum unit
(I also used the method detailed below to repair the vacuum diaphragm in the air cleaner. It is a thermostatically controlled air diverter flap. This diverts warm air from the exhaust manifold when cold starting, and cold air from the intake trumpets when hot. This makes a difference to warm up times and power.)
The vacuum advance or retard unit (dependant on which model V12) is subject to a lot of heat and, unless recently replaced, is guaranteed to be useless and a source of air leakage into the manifold…. not good.
Jaguar used a vacuum retard module on the carb engine distributor because of emissions and the idle at tick over was not very efficient or smooth. The long inlet tracts didn’t help at that engine speed. Consequently the vacuum take-off in the carb is situated just inside the throttle spindle butterfly (cyl. head side) so that at idle, full engine vacuum operated the module and retarded the ignition. As the throttle opens, the vacuum is eased and the distributors centrifugal advance then handles the advance curve. All in all, a way of doing things to achieve a stable and emissions friendly idle, but poor for fuel economy and power. The vacuum supply is also controlled by a thermostatic switch to combat engine overheating in extreme conditions. Altogether, a very complicated setup.
Vacuum module diaphragm repair. ( the "handbag" repair!)
With a grinder, I ground the rolled-over edge off the vacuum module and repaired the diaphragm by using a piece of material cut from an old nylon handbag. The fabric was smeared with a layer of silicon rubber type sealant on both sides of the material to make it flexible and airtight. After the first coat had set, I spread another coat on top – just like spreading butter on bread. Another source of (possibly?) suitable material would be a repair kit for the fabric backed rubberised air-beds that are commonly available. However, I would be tempted to give both sides a coat of silicon rubber sealer because it would protect the material from heat and fumes. I have also been told that silicone sealer will dissolve in fuel, but it's not in direct contact and I've done this before with no problems for years.
The pushrod was a problem. The end is peened over to hold the diaphragm washers and integrity was ruined due to dismantling. A new pushrod was made with an old alternator bolt. Any long, thin bolt might do - perhaps a wire wheel spoke. I put nuts on the threaded end to hold the washers and diaphragm. I heated and flattened the other end and drilled a hole for the distributor spigot.
I reassembled the module with some small self-tappers and installed it into the distributor. Another problem with the retard module (where the vacuum is on the other side of the diaphragm to the advance module) is that it can leak from the plastic seal round the pushrod. I cured this by smearing the rod with petroleum jelly then ran some silicon rubber sealer round the orifice. I left this to cure for a couple of days and it worked perfectly. With timing set up at maximum torque engine speed, as specified in Mike Morrin's data (below) , it was an improvement on running with only the centrifugal advance.
Below is a compilation of data collected by Mike Morrin that I used whenever setting ignition timing. As the timing has to be sorted when installing the Crane ignition, it will be useful. Mike goes on to say...
"I had the opportunity to collect some data from an old Lucas distributor book, so I uplifted all the specs it had on 12 cylinder distributors. Unfortunately the book pre-dated the arrival of the HE and the Digital P.
I have attempted to match the info with Jaguar part numbers and models from Jaguar Manuals, Parts books and a Lucas Spares catalogue.
Note that there are 3 families of advance spec.
Some of the matches between Lucas and Jaguar numbers involve a little guesswork, and one of the Lucas books had a 41677 listed for the 1976 ROW, but I think that was a misprint.
Note that the RPM and advance degrees are referred to the distributor not the crankshaft, and are relative to the static timing. Vacuum is in inches of Mercury.
It would appear that 1975 cars would benefit from a bit more centrifugal advance (as per 76-on)."
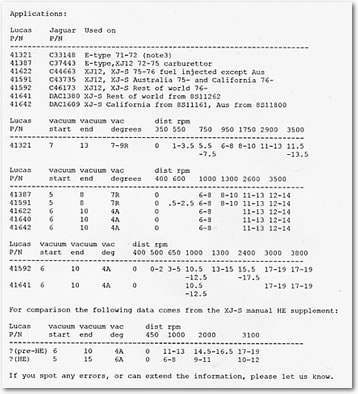
For a larger version of this image, look in Modifications Gallery
Ignition Mods Page 1 - Go to Page one two three
This site is for the benefit of enthusiasts. Much of the content is my own to use as you wish. However, some I have collected from various (forgotten) sources in the public domain. If you are the owner of any material used and wish it to be removed or so accredited, please contact me.
Web Site © Double Six Design
|