Ignition Mods Page 3 - Go to Page one two three
The carb side of things.
Now if you thought the above was fiddly, this is where the fun really starts! Whilst paying a visit to a carb specialist and looking at other Strombergs, I discovered that the drilling for vacuum advance take off goes in from the top of the carb with the hole emerging on the air cleaner side of the throttle butterfly. I had all four carb's off as it happened (for the rebuild) and the retard take off is underneath the left rear carb (from the drivers seat) with the hole inside the carb on the engine side of the butterfly.

The blank spot on the topside of the carb (see photo) where the factory drilling goes is obvious, so I started with a large diameter drill, then an intermediate, and finally a drill of similar diameter as the retard take-off through to the venturi. Fortunately, the drilling came out just where I wanted it (see photo in "Modifications Gallery). All I did then was to araldite a short piece of copper pipe into the larger bore top drilling to make a connection for the silicon rubber vacuum tubing. After checking the Araldite hadn't blocked the fine drilling (I slipped some greased fuse wire into it anyway) I had a brainstorm and did the same on the other three carb's! Unnecessary perhaps, but I just felt that *IF* the drilling wasn't in the right spot, about 2mm. from the fully closed butterfly edge, then one of the other three carb's might work better. ( I need to check this measurement)
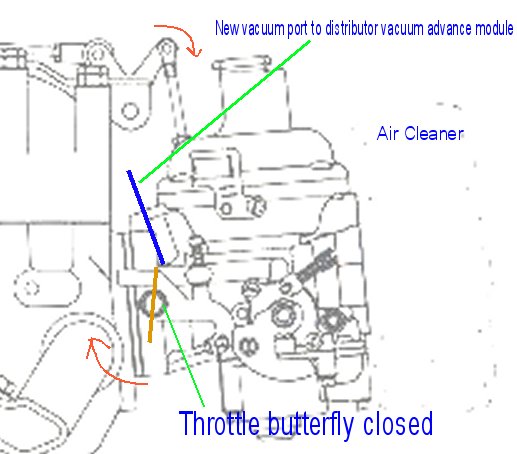
These drillings were lined up using a Mk1 eyeball as I carefully bored in to the carb - not very precise, but following the angle of the carbs body casting, it worked. As it turned out the drillings in the other carb's came out virtually the same place and I used one to connect a vacuum gauge (the type that most people mount on the dash). I temporarily mounted it on the top of the dash so I could see it from the front of the car and when driving. I used it in conjunction with a timing strobe, allowing me to check the action of the advance module when opening the throttle. A vacuum gauge is also good to use when driving.
One other cost-free thing I did was to put a radius on the sharp edge of the inlet manifolds where the mixture comes in from the carb. It's debatable whether this is of value. The sharp edge may help atomisation of the mixture at idle and lower engine speeds, but may harm flow at higher revs. Either way, the difference would not be of any great significance.
I bit the bullet and went for improving flow. It only needs the top 2/3rds grinding away, but is a little difficult to get at. I used some grinding stones mounted in a flexible drill extension. I didn't bother polishing as anything would flow better than that sharp edge. I can't say if it helped the power but it hasn't degraded the idle.
After fitting my modified vacuum advance module and putting everything else back together, I set the static timing at idle and checked it was correct at 3,000 rpm (vac advance disconnected - recommended procedure). Everything was spot on so I took it for a drive.... what a difference! Pulling away on a light throttle standing start seemed twice as quick - it wasn't of course, but it felt that way. Light throttle response was much more lively and after that the engine pulled strongly up to 6000 rpm and probably beyond but I chickened out. My idle is still smooth enough - you can just about feel the engine ticking over when in the drivers seat - maybe not as smooth as a straight six but at least I can tell it's running. I'd say it was about 15 - 20% better in normal driving although bear in mind that my carb's and timing were not perfectly set beforehand.
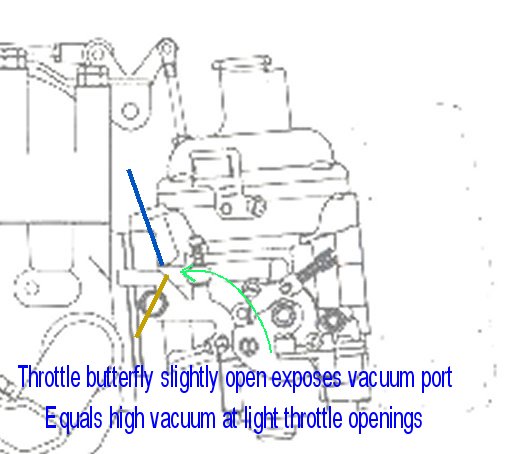
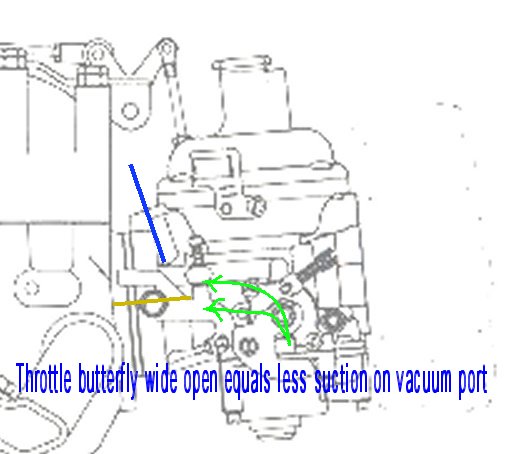
Opening the throttle normally (ie. relatively gently) will give some vacuum advance and then, as the engine speeds up, the centrifugal advance will kick. This is where a little bit of “try it and see” adjustment to the travel of the vacuum advance module came in, too much and it will over-advance and heavy pinking will be heard on acceleration. Adjusting down until the pinking disappears under different types of acceleration and load had it sorted.
Too much advance at the peak power point is the thing that will damage the engine, so I made sure that the total advance on light throttle at cruising speed wasn't over the top by checking with the vacuum advance connected at 3,000rpm. Remember that the vacuum advance dies off during heavy acceleration so that will still be safe. The vacuum advance will come in nicely on the motorway if you want to pick up just a little more speed and also helps fuel consumption. As a further test, I ran the fuel low and put a few gallons of lower octane fuel in. Obviously if it doesn’t pink with this, then it’s a safe setting.
Out of curiosity I reverted back to the retard module to see if the difference was more to do with the carb rebuild than timing. It felt comparatively sluggish on light throttle, although a slightly smoother tickover, but I think the latter was partly the effect of the carb rebuild. Disconnecting the retard altogether made it worse.
This makes me think that the people who say not to bother with any vacuum retard and just disconnect it may not have noticed a difference because their carb's were also maladjusted. So my verdict is, assuming the carb's are set up well, having a correctly working vacuum retard is beneficial. It's what you need if you live in an area where emmissions are still critical for old cars. Changing it to vacuum advance makes it even better. Like I said, the difference is most noticeable on light throttle acceleration, i.e. normal (?) urban driving and motorway cruising plus better fuel economy.
Now the carb's are more efficient (see "Stromberg" page) and the vac advance is working, I may yet be able to give it a bit more centrifugal advance. I have have no trouble with pinking or overheating (cooling system completely overhauled - but advancing the ignition makes it run cooler than retarding) and the plugs show no signs of distress.
Fuel consumption is markedly better. I've gone from a best of 9 - 10 (Imperial) mpg. around town to about 13mpg and 22 mpg motorway driving at 70 – ish. These are rough, early calculations, but I don't think a healthy HE V12 can do much better and an unhealthy one will do worse! Mind you, I don't drive gently all the time, but it shows what can be done.
Another future project is to investigate the possibility of effectively shutting down one bank of cylinders around town. One time, I left the main throttle/carb link to one bank of cylinders disconnected - I didn't notice anything driving gently round town. It felt fine until I got to the open road and wanted more power. Only then did I notice the lacklustre performance and realised that something wasn't quite right. A V12 still runs smooth on only one bank of cylinders!
I've since discovered Roger Bywater was looking into this some years ago, but with fuel injection.
Ignition Mods Page 3 - Go to Page one two three
This site is for the benefit of enthusiasts. Much of the content is my own to use as you wish. However, some I have collected from various (forgotten) sources in the public domain. If you are the owner of any material used and wish it to be removed or so accredited, please contact me.
Web Site © Double Six Design
|