UPDATE: The new REOPUS 4 (Click on the logo above to visit web site) has now been fitted.
For the time being, I'll leave this saga of the American-made Crane Cams XR-700 installation on the site to show the typical problems in fitting that unit. I was never happy with the build quality, the phasing of the timing disc, the rev-counter jumping about and the coil situation. Also, Crane do not state the XR-700 is suitable for running 12 cylinders at 6,500 rpm. Many American V8 engines run fine with it, and they quote figures for 8 cylinders or less - but not 12cylinders. I heard that someone adapted it to the Jag V12 engine and it ran better than the old OPUS, so Crane simply made a timing disc adaptation to sell it for the Jag V12. I have had occasion to contact Crane directly about it and they seemed reluctant confirm many things. Also, I'd heard of a couple of burn-outs if the ignition is left on without the engine running.
Fitting the purpose-designed REOPUS 4 has definitely put my mind at ease!
Crane XR-700 ignition system
UPDATE: Crane cams XR-700 may no longer be available - the Administrators moved in recently.
What's wrong with Opus?
The Lucas “Opus” ignition system is notoriously unreliable. The amplifier packs up due to heat. The symptoms are the car stumbles and dies when hot…. open bonnet, leave to cool, car starts and runs fine then dies again when hot. It will keep doing this and it feels like a fuelling fault.
Replacing the amplifier is best - but originals are no longer available. I’ve heard a rather expensive look alike system is available in the UK for concours enthusiasts (although the wires and connectors are different to original colours). It is based on the later Jaguar/Lucas CEI system from the 1980's and, as such, is still a dated system. It also means you have to surrender your original parts for remanufacturing with new bits. If you ever needed to go back to original parts, you're stuffed!
Lumenition systems have had some good and bad reports and also seem difficult to obtain. With the XR700, Crane Cams themselves seem to be confused (I got conflicting advice when phoning them and their distributors), but Jaguar V12 user reports are that they work quite well… except for a couple of problems.
The brackets to fit the optical replacement distributor pick-up are cheap and flimsy—mine broke at 4000 rpm with a frightening BANG. I thought the engine was destroyed! The brackets had moved causing complete shutdown of ignition and 12 cylinders worth of fuel/air went straight into a red-hot exhaust pipe and blew the silencer!
Here’s how I overcame the problems of fitting the Crane XR700. Ed Sowell has described the way he did it on his web site (see Links page). Both methods have for and against arguments, but mine fits in well with the vacuum advance modifications I had in mind (see "Ignition Mods. Pages"). It also gives more adjustability.
They way I did it also reinforces an area of the pick-up carrier that is weak where the screws holding the pick-up go in (mine had already split). It gives the screws a lot more material to bite into. However, my method is a little more involved than Ed Sowell's. Of course, the modern-day ultimate solution would be a distributorless system with multi-pack coils and programmable advance/retard etc. Electromotive (USA) do one but I don’t know if they have any dealers in the UK. I've heard of some owners who have used a "Megasquirt" controller and a home-built system from used components, but that is further than I want to go right now.
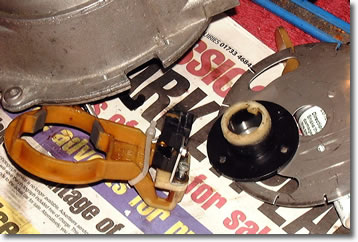
My installation. (see "Crane" photos in Modifications Gallery
The original Lucas setup has a nylon timing disc with ferrite strips round the outside. These set off the magnetic pick-up to trigger the amplifier. One point to note is that any system using a vacuum advance/retard module will put a strain on the wires where they join the pick-up. You will see I have strapped the new wires to the pick-up carrier to alleviate this.
It is years since I did this installation, so I’m writing to the best of my recollection.
The Crane package comes with various bracketry that can be bolted together to mount the pick-up and be able to adjust the position. I tried a combination of two items, but wasn’t very happy with the solidity. I couldn’t tighten the nut and bolt up very well but tried it.
It worked fine for a few miles until I took it up to 4,000 rpm whilst overtaking a Mercedes Benz. The engine went with a loud bang and a huge cloud of black smoke out of the exhaust. I pulled over and the M-Benz went past laughing!!
I was extremely embarrassed and had to get a tow home dreading what I might find after such a loud explosion. Of course, the bracket had moved causing a misfire followed by a huge backfire in the exhaust system.
The Crane package comes with a one-piece bracket (for other applications) that is more solid and matches the original pick-up’s mounting holes. If I remember correctly, to use it means the optical pick-up needs mounting the other way up. The trouble was that this positioned the pick-up too low and to one side slightly.
To overcome the height problem, a small block underneath the pick-up mounting plate was needed. A part of the original Lucas timing disc was ideal. I used a small hacksaw to cut a rectangle from the disc between the rim and the hub which gave me a suitable thickness.
See more photos in the Modifications Gallery
After trimming to shape, I used Araldite to glue it to the carrier. One of the original holes for the pick-up screws had split on my carrier, probably due to someone using the wrong size screw. The new nylon “booster” block would solve this by giving new material for some longer screws to bite into. I opened up the holes in the Crane metal bracket to allow some tilting movement when the screws were slackened off. This is because the pick-up needs to move away to clear the timing disc when it is pushed on.
By using the one-piece mounting bracket as shown in the photos and the pick-up inverted, it meant that the wires for the pick-up emerged from the opposite side to the original. This wasn’t a problem when using a tie-strap. Just make sure there is enough free play in the leads to allow for full movement of the carrier. The paler, whitish bit under the pick-up metal mount (photo) is the bit I glued on the carrier to raise it.
An important point here. Where the plastic pick-up carrier rotates around the body of the distributor is prone to wear. On mine it had worn ridges which would've held back the movement of the carrier when the vacuum advance mechanism tried to move it over the ridges. It would also increase the air gap between the pick up and the timing wheel - especially critical in an OPUS based system.
I simply filed the ridges down to a smooth curve, applied moly grease and had no problem.
Because of the new pick-up mounting method, it meant that it was a few degrees out compared with the original’s alignment. To overcome this I modified the steel timing disc to make it adjustable a few degrees either way. First I filed off the key in the centre of the disc to allow the disc to be rotated on the hub. This meant a new key needed to be made somehow. From the bottom of the original Lucas nylon timing wheel disc I cut off about 5mm. slice (the whitish bit on the new hub in the photo) and the same amount off the Crane hub. I used Araldite to glue the slice off the old hub to the new and this gave me a new key. I was a little worried as to whether the epoxy glue would hold to the plastic/nylon parts, but it has been on now for a couple of years and is fine. After all, there is no real load placed on this joint. It’s just to spin the disc.
Now back to the metal timing disc. To allow adjustment of the optic cut-outs on the edge of the disc in relation the hub key, I elongated the disc-to-hub mounting holes with a file. This took quite a while but they do not need much elongation as you will see from the photos. The edge of the hole is just visible on one side of the pop-rivets I used to secure the disc. Be careful to ensure the disc is still centralised on the hub or it will not spin true when the engine is running. The aim is to make mini versions of the three slots near the rim of the disc. I used pop-rivets with a backing washer under the plastic hub flange, but I daresay self-tappers or small nuts and bolts with spring washers and/or Loctite could be used. As Ed Sowell says, it’s a pity Crane did not make the holes like this in the first place.
These modifications meant that I could adjust and align everything to produce a correctly timed firing signal. It also meant that the vacuum advance OR retard (whichever you use) movement of the pick up carrier was not restricted by the body of the distributor. If I want to remove the disc, I unscrew the pick-up mounting screws about half way and there is just enough slack to move it clear of the disc.
Amplifier location.
I contacted Crane and they said the pick-up to amplifier lead could be lengthened providing the same type of wire was used. I did this and temporarily wedged the amplifier behind the brake servo rather than mount it on the hot engine. It’s still “temporarily” wedged there!
Coil.
My original coil (a now impossible to get original Lucas 13C12) was fine. However, I bought a Crane PS91 to go with the XR-700 amplifier on a dealer’s recommendation (who no longer exist!). At a later date, I contacted Crane Cams themselves and they said that the PS91 coil is NOT recommended for the XR700!!!
It worked fine for me, but I’ve heard of another who fried the Crane amp with this coil by leaving the ignition switched on without the engine running. Until I get back to sorting this issue, I have re-installed my original Jaguar coil. If you want to replace your coil, Crane recommend their PS40 coil. Occasionally my rev. counter jumps about or dies completely for a while so I think I need to include this in my future investigations into the coil issue.
Anyway, the car runs and starts very well. It seems to rev cleanly and willingly up to the redline on the road. I tested the spark on a Gunson Sparktester and it jumps a huge gap — I know, not very scientific for a high revving V12 but, at least the engine doesn't die on me from an overheating amplifier. However, Crane get black marks from me for the quality, fittings, and customer technical support. I suppose they themselves are unsure about it being used on the V12 - after all, it was originally designed some years ago in the States to run mainly V8's - it just happens to work a bit better than the old Opus amp.
When I came across the REOPUS, I was impressed by the build quality and the vastly improved specifications - but mainly, the fact that it was designed from the outset to run 12 cylinders at high revs (8,000), with very accurate timing between cylinders - an aspect I'd never thought about before. Luckily, I had a spare distributor so the original parts went back in and the new amplifier circuit went into the original case without any hassle. Performance improvements? Well, I can't say I've tested it scientifically, but it certainly does feel better through the seat of my pants and an occasional misfire on tickover has gone. I just wish the REOPUS had been available earlier!
This site is for the benefit of enthusiasts. Much of the content is my own to use as you wish. However, some I have collected from various (forgotten) sources in the public domain. If you are the owner of any material used and wish it to be removed or so accredited, please contact me.
Web Site © Double Six Design
|